After my big rant yesterday, I was pleasantly surprised with how my Doctor Who cupcakes turned out - and with how easy they were to do!
LOOK AT HOW CUTE THEY ARE!
These are the first cupcakes I've made for the blog that I've been this happy with.
To make them I used my
coconut cupcake recipe with basic
buttercream before decorating with Orchard's White Icing (and making a mess of my hands and kitchen mixing colours. Worth it).
So how exactly to you make the 'Doctor Who' part of Doctor Who cupcakes? Well, let's take a look at my little dudes one by one...
1. The Dalek:
Or to be more accurate, a portion of a Dalek body. Would you call it a 'body' though? Doctor Who fans will know what I mean -
I hope :)
Colour your fondant (keep extra icing sugar handy as adding food colouring to fondant/white icing can be a sticky business). Dust your work surface with icing sugar (and your coloured fondant too for good measure) and roll out thin. Cut out with whatever circular cutter fits the size of the cupcake.
I used a drinking chocolate lid :P
Press onto the cupcake and roll out small balls of lighter coloured fondant. Space them evenly on the cupcake and press down. Use a bit (a teeny tiny bit!) of water if they need help sticking. Use a sharp knife to cut lines for sections.
I really hope all this is making sense. Anyway, moving on...
2. The Doctor:
Or more specifically, the 11th Doctor.
You can totally tell from the hair and bow tie :P
As before: colour fondant, roll out thin, cut and press onto cupcake. Since I have no black fondant or piping bag (grumble, grumble) I made very cutesy blue eyes by rolling out teeny blue balls of fondant (I had plenty of practice after yesterday...) and adding even teenier white balls on top for light.
You know, as you do.
To make The Doctor's nose, roll a small ball out of the same skin colour and press down - flattening one side only. Roll out a small snake of pinkish fondant and curve into a smile for his mouth.
3 balls of red fondant strategically placed make up his bow tie.
As always, use a little water to stick bits down if need be.
As for The Doctor's iconic hair, roll out 2 fat brown snakes - one short, one long. Make them thinner at one end and press the fat ends together to make his side part.
And you have yourself an 11th Doctor cupcake! Whoo!
3. The Ood:
I am super pleased with how cute this little guy turned out :)
You can really use the same colour fondant for both the Doctor and the Ood's skin, but I added a little extra yellow to the Ood. Because I could. As ever: colour, roll, cut and press. Roll out pinkish fondant into small thin snakes to make the mouth: attach the longest one in the centre of the cupcake and go out either side from there in a triangle.
If all this doesn't make sense, just look at the picture. It's pretty self explanatory :P
Use the same pinkish fondant for the Ood's eyes. I made these by making diamond shapes and flattening them out. Rather than leaving the Ood looking possessed by demons, finish off with small brown circles and even smaller white circles on top.
Easy peasy!
Is that how you spell 'peasy'?
Anyway, lucky last (and my personal favourite)...
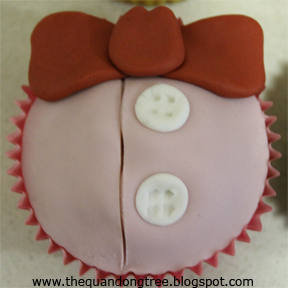
4. The 11th Doctor's shirt:
Look! Buttons!
Once again: colour, roll, cut and press. Slice the fondant slightly off the the left with a knife to make a line down the shirt. Roll out 2 small white balls and press down for the buttons. Use a fork to mark the 'button holes'.
To make the bow tie flatten out 2 equal sized maroon coloured balls into what I like to call 'vague triangles'. Another equally accurate and bizarre term would be 'lazy love-hearts'. Place them side by side up the top of the cupcake. Finish off with a slightly flattened ball of maroon fondant that's been pinched up the top.
And if you've managed to work through and decipher this guide, you've now got yourself 4 super cute Doctor Who cupcakes!
Awwwww.
Is it weird that I find the Ood cupcake so adorable? Cos I do.
Just sayin.


.png)


